Thursday, 21 September 2017

Salesforce Trailhead : Lightning Experience Rollout Specialist

Salesforce Trailhead : Lightning Experience Rollout Specialist

Before I start sharing information about superbadge. I am sharing a link of an unmanaged package. After installing this unmanaged package in your org you will be able to clear App builder and Suggestion Box badges which are pre requisite to unlock this superbadge.

Note: Before installing this package enable lightning, domain and account teams in your org.

https://login.salesforce.com/packaging/installPackage.apexp?p0=04t28000000bALD

Challenge 1:

Login your org go in Setup--> Account--> Button Links and Actions-->Click on account tab
Override with Visualforce page Account Tab

Go in Setup--> Home Page Layouts --> DE Default--> Edit--> Add Destination Success Registration component.

Create Two users with below screen shot information.

Create two Permission sets
LightningExperiencePilotSales 
LightningExperiencePilotCommunications

Lightning Experience Pilot Sales will have only lightning user permission as per screen shot.

Lightning Experience Pilot Communications will have lightning user permission as well as not allow to switch between lightning and classic. As per screen shot.


Setup-->Lightning Experience Migration Assistant-->Get Started-->Next-->Tab Check Readiness-->Click Button check Readiness. This will send a report to you.

Setup-->Monitor-->Optimizer--> Launch . This will send you a report.

Challenge 2:

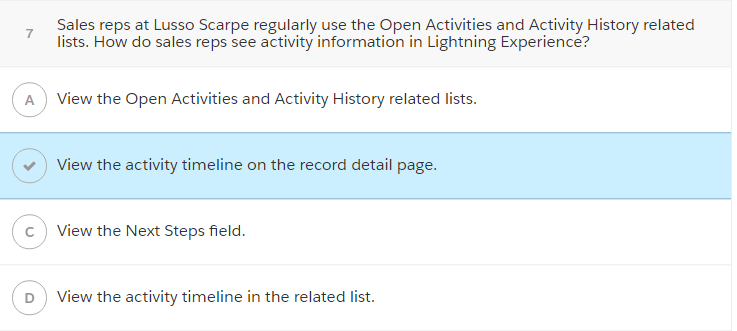
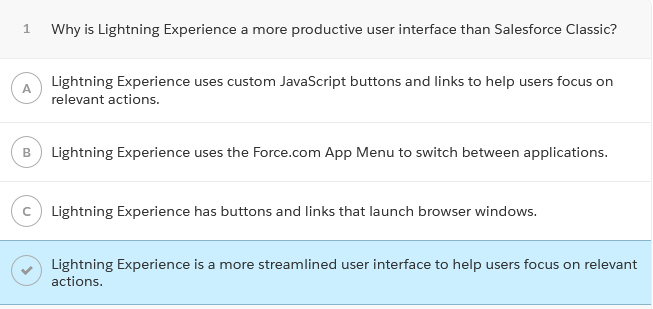
It is a quiz and below are screen shots of it.


Challenge 3:

For your Visulaforce page of account override code with this one.

<apex:page standardStylesheets="false" standardController="Account" recordSetVar="accounts" tabStyle="account">
<apex:slds />

    <div class="slds-scope">
        <apex:pageBlock >
 
            <apex:pageBlockTable value="{!accounts}" var="a"  styleClass="slds-table" >
                <apex:column headerValue="{!$ObjectType.Account.Fields.Name.Label}">
                    <apex:outputLink value="{!URLFOR($Action.Account.View, a.id)}">{!a.name}</apex:outputLink>
                </apex:column>
             
            </apex:pageBlockTable>
        </apex:pageBlock>
    </div>

</apex:page>


For documents, download Destination Success image from documents and upload it in Files and make it available for users.

Challenge 4:
Create 2 account record types and 2 compact layouts and assign them to appropriate profiles.

Setup--> Path Setting--> Create New Path with below given values. Make sure that you add guidance for success values too and activate path.

**Stage****Fields****Guidance for Success**
QualificationAccount Name, Opportunity Name, Description- Ask the buyer about their favorite footwear.
- Share the most appropriate sections of our catalog.
- Share testimonials from fashionistas.
- Present our most popular ranges to the buyer.
Needs AnalysisExpected Revenue, Main Competitor(s), Next Step, Probability(%)- Ask about the maximum price that the buyer is willing to spend.
- Ask: "Is there anything else you'd like to know or need to proceed with the purchase?"
- Set a date for follow-up.
Negotiation/ReviewAmount, Quantity, Stage- If the buyer seems likely to walk away from the deal, discount 5%.
- Follow up on questions or needs from the buyer.
Closed LostClose Date, Next Step- Create post-mortem notes.
- Set a follow-up date for 1 year from today.
Closed WonClose Date, Delivery/Installation Status- Celebrate in Chatter!
- Check with the Accounts team for payment processing.

Challenge 5:
It is a quiz and below are screen shots of it.


Challenge 6:


  1. Create the App page with name : Key Sales Data
  2. select any template 
  3. add Filter List component from left side component list.
    1. In the Filter List Component select Account and for filter value select 'New This Week'
  4. Add Recent Items component, in object select : opportunity,Lead,Contacts.
  5. In Actions select Log call and New Opportunity component.

Create a lightning App named it Communication. Use Account, Chatter, reports and Dashboards tab only and assign to custom sales profile.

Create a lightning page as record page on group object and use following items on it.
Page name will be Group Record Page.
Highlights Panel
Record Detail
Recommendations
Trending Topic
Activate this page and assign it as Org Default.
Create a chatter group with name All Lusso Scarpe Employees and Description as This group is for all Lusso Scarpe employees to collaborate and receive company announcements. All employees can join the group. Make it a public group.

Challenge 7:

Create a report name Opportunities Pipeline.  Use opportunity and then group by report with stage--> Type--> Probability and sum account field.
No filters all opportunities with all time.
Add funnel chart with stage and record count.
Schedule report-John Wiseman wants to review the Opportunities Pipeline report each week. Set it up so he receives refreshed report results by email every Monday at 8:00am.


Add this chart in lightning page on account object you created in app builder badge. Name this chart as Opps by Stage.
Create a Dashboard name Sales Operations and a dashboard folder name Sales Operations. Make dashboard as logged in user save it sales operation folder and add filter on opportunity stage.
  • Horizontal bar chart called Opp Probability by Stage, showing probability by stage
  • Gauge called Sum of Opportunity Amount, showing the sum of revenue generated by all opportunities
  • Donut called New and Existing Business, showing the sum of revenue generated by new and existing business.

Challenge 8:

Enable knowledge lightning. Before searching for knowledge make sure that you are a Knowledge user. Go on your user record and check the knowledge user checkbox.
Note: Make sure that you enable lightning knowledge.
Now go Setup--> Knowledge Object Setup-->New fields and relationship.
Create a field Question Text(255)
Create a field Answer Rich Text Area(32768)
Now go on Record type--> New.
Create 3 record types Community, FAQ, Product.
Now go on Pagelayouts --> New.
Create 3 pagelayouts faqpagelayout, productpagelayout, and communitypagelayout and assign it to respective layouts.
Add question answer and record type field on above 3 layouts.
Go in Salesforce lightning. Click setup and then go app manager. click on new lightning app.
Create a lightning App and named it Lightning Knowledge.
In utility bar add history component.
Selected tabs will case accounts and contacts.
Go in lightning app builder--> New.
Create a new home page name Org Home.
Add Chatter feed, Today's Tasks, upcoming events, recent items, smart scope recent records.
Activate page and assign it as default for Org.
Note: in recent items component make sure that you have account contact and cases are added as tabs.

Challenge 9:

It is a quiz and below are screen shots of it.


Challenge 10:

Create a lightning component "DestinationSuccess".
In component put this code.

<aura:component implements="force:appHostable,flexipage:availableForAllPageTypes,flexipage:availableForRecordHome,force:hasRecordId,force:lightningQuickAction" access="global" >

 <aura:attribute name="myURL" type="String" default="https://www.salesforce.com/campaign/destination-success/overview/"/>


    <ui:outputURL value="{!v.myURL}" label="DestinationSuccess" target="_blank"/>
    
</aura:component>
in controller write this code.
({
    navigate : function(component, event, helper) {
         var address = component.find("address").get("v.myURL");
        var urlEvent = $A.get("e.force:navigateToURL");
    urlEvent.setParams({
      "url": 'https://www.salesforce.com/campaign/destination-success/overview/' + address
    });
    urlEvent.fire();
    }
})
Switch org to lightning if you are not alredy in it. 
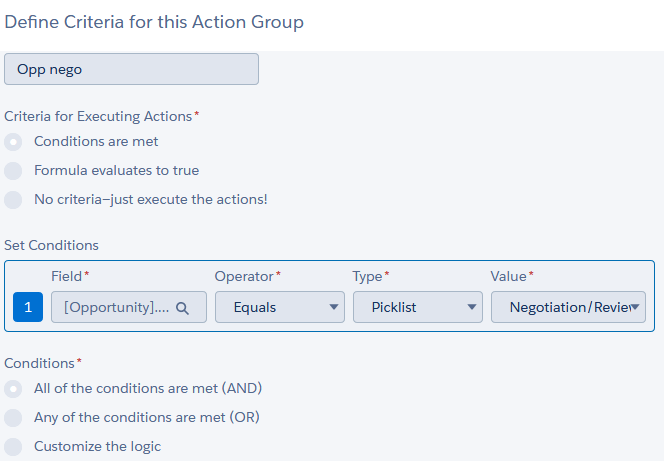
Go in setup--> App Manager--> App--> Sales lightning app---> Edit.
Add newly created destination success component in utility bar.
Go on Object manager --> Case --> Button links and Action--> New Action.
Create an action with name UpsellCrosssellOpportunity. Use lightning component create opportunity.
Add this link on case layout.

Create a report with name Campaign Influence Lightning.
Use already built in Campaign Influence report type.
Make it a summary report. Show all campaign. Add filter campaign name equals blank and campaign id equals blank.
Sum Opportunity amount and group by campaign name.
Add following columns as shown in screen shot.

Copy this report id and keep it we will use it later.
Go in Setup --> Object Manager --> Campaign ---> Button links and Action--> New Button or link.
Create a detail page link and name it View Lightning Campaign Influence Report.
Add below Url
/one/one.app#/sObject/00O7F000003ynrX/view?&fv0={!Campaign.Name}&fv1={!Campaign.Id}
replace 00O7F000003ynrX idwith your report id.
Add this link on page.

Now you are done. You successfully competed Superbagde :)

Friday, 15 September 2017

Lightning - Change quote status to approve

Lightning - Change Quote Status to Approve

Few days back i got chance to work on lightning. Al thought it is very small request but wanted to share my code here.

Business Requirement

On Quote object( Custom Object due to some business requirements) clients needs a button called "Approve". so once this button is clicked quote status should be changed to approve. Doing this in classic is a piece of cake but lightning is a bit new for me, so i have to put some time to get familiar with Aura framework.

Solution

Created a lightning component and use it on the object specific action to show a button in lightning.

Handler Code

({ doInit : function(component, event, helper) {
    var qid = component.get("v.recordId");
        var action = component.get("c.saveQuote");
        action.setParams({"QID": qid});

        action.setCallback(this, function(response) {
            var state = response.getState();
            if(component.isValid() && state == "SUCCESS"){
                var c = response.getReturnValue();
                component.set("v.quote", c);
                $A.get("e.force:closeQuickAction").fire();
                $A.get('e.force:refreshView').fire();
            }

            else {
                console.log('There was a problem : '+response.getError());
            }
        });
        $A.enqueueAction(action);


} 
})

Class Code

public class ApproveQuoteController 
{
public static FConnect__Service_Quote__c saveQuote(Id QID){
    FConnect__Service_Quote__c Cquote= [select id,name,FConnect__Account__c,FConnect__Status__c,FConnect__Contact__c,FConnect__Site__c,FConnect__Problem__c
                   from FConnect__Service_Quote__c where id=:QID limit 1];
                       
        Cquote.FConnect__Status__c = 'Approved';

        update Cquote;
        return Cquote;
    }
}

Component Code

<aura:component controller="ApproveQuoteController" implements="force:appHostable,flexipage:availableForAllPageTypes,force:hasRecordId,force:lightningQuickAction" access="GLOBAL" >
    <aura:handler name="init" value="{!this}" action="{!c.doInit}" />

</aura:component>

Wednesday, 9 August 2017

Salesforce Trailhead : Process Automation Super Badge


Challenge 1:

Validation rule on Lead

Country Validation Rule

Condition Formula: NOT( 
OR(
Country = "US",
Country = "USA",
ISBLANK( Country )
)
)

Error Location: Field Country

State Validation Rule

Condition Formula: OR( 
LEN(State) <> 2,
NOT(CONTAINS("AL:AK:AZ:AR:CA:CO:CT:DE:DC:FL:GA:HI:ID:" &
"IL:IN:IA:KS:KY:LA:ME:MD:MA:MI:MN:MS:MO:MT:NE:NV:NH:" &
"NJ:NM:NY:NC:ND:OH:OK:OR:PA:RI:SC:SD:TN:TX:UT:VT:VA:" &
"WA:WV:WI:WY:PR", State))
)
Error Location: Field State

Queues:

Queue Name: Rainbow Sales

Queue Name: Assembly System Sales

Assignment Rule:

Rule Name: Trailhead Assigment Rule

Challenge 2:

Account Validation Rules

Billing Country Rule


Shipping Country Rule

Billing State Rule


Shipping State Rule


Account Name Rule

Account Fields:


  • Number of deals (Roll-Up Summary field): Count Opportunity. No filter criteria
  • Number of won deals (Roll-Up Summary field): Count Opportunity with filter criteria as "Stage equals Closed Won"
  • Last won deal date (Roll-Up Summary field): MAX(Opportunity: Close Date) with filter criteria as "Stage equals Closed Won"
  • Deal win % (Formula field): Number_of_won_deals__c / Number_of_deals__c
  • Total amount of won deals (Roll-Up Summary field): SUM(Opportunity: Amount) with filter criteria as "Stage equals Closed Won"
  • Call for Service (Formula field): IF( DATE( YEAR(Last_won_deal_date__c)+2 , MONTH(Last_won_deal_date__c) , DAY(Last_won_deal_date__c) ) <= TODAY(), 'Yes', 'No')

Challenge 3:

Custom Object Creation


Challenge 4:

Add Stage Value:


Add Custom Field:


Add Sales Process:


Add Recordtype

Validation Rule

Challenge 5:

Approval Process:


Note: Make sure you populate manager field on your user record with some valid user. In this case make your manager as Naushi(User you created in your org). If you wont select user manager you wont be able to submit for approval.

Email Alert


Note: Make sure you add a user in email alert

Process Builder:

Opportunity object with option created and updated.

1st and 2nd node end will be changed to evaluate next criteria.


1st Node Criteria

Opportunity Account Type = customer and opportunity.account id not equal to null

1st Node Action

2nd Node Criteria

Opportunity stage = prospecting and opportunity.account id not equal to null and opportunity account type = Prospect.


Note: there will be 2 actions 1 is email same as above and second is creating task. 

2nd Node Action:


3rd Node Action:

Opportunity Stage = Negotiation/Review

3rd Node Action:

4th Node Criteria:

Opportunity Stage = Closed Won

4th Node Action:

2 actions are used in this node.


Challenge 6:

Flow:


  • Flow must be of type Flow. 
  • Screen with 3 choices and store the result in screen choice fields : ProductType
  • Lookup to find records in product2 with contains ProductType and store them as variables (Id + name) 
  • Screen to display variables 
  • Activate the flow 
  • Add the flow to the opportunity screen using app builder.


Lightning Page:

A record page on Opportunity object. 
Drag and drop flow component on it and save.
Activate page.


Challenge 7

  • Change field type of field "Day of the Week" on robot object to formula text and use below formula.
  • CASE( MOD( Date__c - DATE(1900,1,6),7) , 0, "Saturday",1,"Sunday",2,"Monday",3,"Tuesday",4,"Wednesday",5,"Thursday",6,"Friday","")
  • Go on Process builder created in step 5.(You have to clone this Process Builder in order to make changes)
  • Go on 4th Node of closed Won opportunity.
  • Go on action create setup record.
  • Change formula of date field from [Opportunity].CloseDate + 180..
  • to
  • CASE(MOD([Opportunity].CloseDate + 180 - DATE(1900, 1, 7),7), 0, [Opportunity].CloseDate + 181, 6, [Opportunity].CloseDate + 182, [Opportunity].CloseDate + 180)
  • Save and activate.
Happy Coding!!!

Monday, 5 June 2017

Dell Boomi: Read all repeating tags text and put in one text field using groovy

Read data of all repeating tags and put in one text field

If you are working with Dell Boomi in order to integrate SAP data you must find a need for this, as this is SAP standard behavior that when it creates an XML or IDoc of text data it start reapeating tags till the number of enter in that field.

E.g:
In SAP you enter following text:
This is my first blog
I am writing this blog about Dell Boomi
and SAP general behaviors

When an IDoc/XML file will be created it will look like this:
<IDOC BEGIN="1">
<Notes>This is my first blog</Notes>
<Notes> I am writing this blog about Dell Boomi </Notes>
<Notes> and SAP general behaviors </Notes>
</IDOC BEGIN="1">

Problem
Now issue is that your destination system need this complete text in one field along with enters. If you directly map this tag in your map component only Dell Boomi will only read first ever line and all the other text will be gone.

Solution
In order to solve this issue you can use groovy in data process to read all these kind of repeating tags and then create a new node in your process and map that node with your destination text field.

Groovy Code: 
import java.util.Properties;
import java.io.InputStream;
import org.jdom.input.SAXBuilder;
import org.jdom.Document;
import org.jdom.Element;
import org.jdom.xpath.XPath;
import org.jdom.output.XMLOutputter;
import com.boomi.execution.ExecutionUtil;

Integer Count = 0;
for( int i = 0; i < dataContext.getDataCount(); i++ ) {

 InputStream is = dataContext.getStream(i);
 Properties props = dataContext.getProperties(i);
   
 // Build XML Document
 SAXBuilder builder = new SAXBuilder();
 Document doc = builder.build(is);

 XPath Approved_Pricing;
 Approved_Pricing = XPath.newInstance("//ZDEBMAS/IDOC/E1KNVVH[TDID='Z002']/E1KNVVL/TDLINE");
 
 MSGFN = Approved_Pricing.selectNodes(doc);
 
 Desc='';
 result = new StringBuffer();
for(int ak=0;ak<MSGFN.size();ak++){
if (Count < 10){
result.append(MSGFN[ak].getText()+System.getProperty('line.separator'));
Count = Count + 1;
}
}
    Desc = result.toString();
Notes = new Element("Pricing_Notes_Description").addContent(Desc);
x = XPath.newInstance("//ZDEBMAS/IDOC");
    eleParentElement = x.selectSingleNode(doc);
    if(eleParentElement !=null){
      eleParentElement.addContent(Notes);
    }
     XMLOutputter outputter = new XMLOutputter();
     is = new ByteArrayInputStream(outputter.outputString(doc).getBytes("UTF-8"));

     dataContext.storeStream(is, props);
}

You are adding a new element Notes in the root IDoc which you can then map to your destination field.you also have to provide complete and accurate path of that repeating tag.


Hope this helps you. Happy Coding !!!

Wednesday, 31 May 2017

Dell Boomi: Update Flat File/CSV data using groovy script

Update data of CSV file using Groovy

In this blog i am trying to share my experience of updating csv data using groovy scripts. I had an explicit requirement that i have to remove leading zeros from a integrer data field before passing it to my map.

As you all work on Dell Boomi so you know that in Boomi there are so many built in Strings function which can do this task very easily or you can use a simple javascript code to achieve this functionality.

Javascript code:

Output = Input.replace(/^0+/, '') ;


I have to do this by groovy because in the data process you can only use groovy script and i have to remove leading zeros before passing it to map function.

Sample file:

test-trstevens113@msn.com,Test User,0000100098,8797784047620,trstevenstest@msn.com,,,0,2016-01-18 11:36:32.847,0000123652
test-tstevens@lves.washk12.org,Test2 User,0000100098,87976289823652,tstevens222@lves.washk12.org,,,0,2016-01-18 11:35:45.327,000012352


Note:
I have to remove leading zeros from column 3 that is "0000100098" but in code below i use 2 as this is indexed with zero.

Code of Groovy:

import java.util.Properties;
import java.io.InputStream;
import java.io.BufferedReader;


String DELIMITER = ",";

for( int i = 0; i < dataContext.getDataCount(); i++ ) {

   InputStream is = dataContext.getStream(i);
   Properties props = dataContext.getProperties(i);

   BufferedReader reader = new BufferedReader(new InputStreamReader(is));
   StringBuffer outData = new StringBuffer();
   int lineNum = 0;
      
   while ((line = reader.readLine()) != null) {
// Parse the line into separate columns splitting on the delimiter defined above
String[] columns = line.split(DELIMITER);

         // Obtain a column's value by its known position on the line (zero-indexed)
String someColumnValue = columns[2];

columns[2] = someColumnValue.replaceFirst("^0+(?!\$)", "");
for(int k = 0; k < columns.length; k++){
outData = outData.append(columns[k]+DELIMITER);

//outData.append('\n');
}
    
      lineNum++;
   }
   
   // Convert the output StringBuffer to an InputStream and store in the dataContext
   is = new ByteArrayInputStream(outData.toString().getBytes("UTF-8"));
   dataContext.storeStream(is, props);
   
}

Hope this helps you. Happy Coding !!!

Friday, 26 May 2017

Apex: Dynamic Scheduling of batch job for quarters from VF page

Schedule Batch job for Quarters from Visualforce Page:

Few days back i get chance to work for a client requirement to give ability to schedule a batch job quarterly from a visualforce page. As you all know that you can not even schedule a batch job quarterly from salesforce UI.


In order to schedule a job on quarterly manner I have to first calculate the dates and time input by your user. I am illustrating my requirements here with screen shots.
  • A picklist to select frequency
  • A picklist to select date option
  • A picklist to select date operator
  • A text box to enter  number of days
  • A picklist for start time


Controller Class Code:


  • First of all calculate first/end of quarter

/************************************GetFirstOfQuarterMonth****************************/
    public Integer GetFirstOfQuarterMonth(){
       
        if(date.today().month() ==1 || date.today().month() ==2 || date.today().month() ==3)
            return 1;
        else if(date.today().month() ==4 ||date.today().month() ==5 || date.today().month() ==6)
            return 4;
        else if(date.today().month() ==7 || date.today().month() ==8 || date.today().month() ==9)
            return 7;
        else
            return 10;
    }
/************************************GetEndOfQuarterMonth****************************/
    public Integer GetEndOfQuarterMonth(){
       
        if(date.today().month() ==1 || date.today().month() ==2 || date.today().month() ==3)
            return 3;
        else if(date.today().month() ==4 ||date.today().month() ==5 || date.today().month() ==6)
            return 6;
        else if(date.today().month() ==7 || date.today().month() ==8 || date.today().month() ==9)
            return 9;
        else
            return 12;
    }


  • Validate Frequency Number


/****************IsValidFrequencyNo***************************/
    public Boolean IsValidFrequencyNo(String Value){
        Boolean flag = false;
        if(Value != null) {
            String CalRegex = '^(?:[1-9]{1}|4[0-6]|2[0-9]|3[0-9]|1[0-9])$';
            Pattern CalPattern    = Pattern.compile(CalRegex);
            Matcher CalMatcher    = CalPattern.matcher(Value.trim());
            flag                    =  CalMatcher.matches();
        }
        return flag;
    }

  • Calculate Cron string

if(SelectedRenewalFrequency == Constants.QUARTERLY){
            String QuarterDate = '';
            
            if(SelectedRenewalFreqDatePeriod == Constants.FIRSTOFQUARTER_VALUE){
                
                if(!String.IsBlank(SelectedRenewalFreqValue) && !String.IsBlank(SelectedRenewalFreqDateOperator)){
                    Integer FOQMonth = GetFirstOfQuarterMonth();//Getting quarter month
                    date startOfQuarter=Date.valueof(Date.today().year()+'-' + FOQMonth +'-1');//Getting start of quarter
                    String AllMonth = '';
                    if(SelectedRenewalFreqDateOperator == Constants.PLUS){
                        if(startOfQuarter.adddays(integer.valueOf(SelectedRenewalFreqValue)) < date.today())
                    startOfQuarter = date.valueOf(startOfQuarter.addMonths(3));
                        QuarterDate = string.valueOf(startOfQuarter.adddays(integer.valueOf(SelectedRenewalFreqValue)).day());
                        Integer MonthNo = Integer.valueOf(startOfQuarter.adddays(integer.valueOf(SelectedRenewalFreqValue)).month()) - FOQMonth;
                        Integer TwelvethMonth = 10+MonthNo; 
                        if(TwelvethMonth >12)
                            TwelvethMonth = MonthNo;
                        AllMonth = String.valueOf(1+MonthNo)+','+String.valueOf(4+MonthNo)+','+String.valueOf(7+MonthNo)+','+String.valueOf(TwelvethMonth);
                    }
                    else{
                    if(startOfQuarter.adddays(integer.valueOf('-'+SelectedRenewalFreqValue)) < date.today())
                    startOfQuarter = date.valueOf(startOfQuarter.addMonths(3));
                        QuarterDate = string.valueOf(startOfQuarter.adddays(integer.valueOf('-'+SelectedRenewalFreqValue)).day());
                        Integer MonthNo = Integer.valueOf(startOfQuarter.adddays(integer.valueOf('-'+SelectedRenewalFreqValue)).month()) - FOQMonth;
                        Integer FirstMonth = 1+MonthNo;
                        if(FirstMonth == 0)
                        FirstMonth = 12;
                        if(String.valueOf(FirstMonth).contains('-')){
                            if(FirstMonth == -1)
                                FirstMonth = 12;
                            else
                                FirstMonth = 11;
                        }
                        Integer TwelvethMonth = 10+MonthNo; 
                        if(TwelvethMonth >12)
                            TwelvethMonth = MonthNo;
                        AllMonth = String.valueOf(FirstMonth)+','+String.valueOf(4+MonthNo)+','+String.valueOf(7+MonthNo)+','+String.valueOf(TwelvethMonth);
                        if(FirstMonth == 12)
                        AllMonth = String.valueOf(4+MonthNo)+','+String.valueOf(7+MonthNo)+','+String.valueOf(TwelvethMonth)+ ','+String.valueOf(FirstMonth);
                    }
                    sch = '0 0 '+ Schdtime+ ' ' + QuarterDate + ' '+ AllMonth + ' ? *';
                }
                else
                    sch = '0 0 ' + Schdtime + ' 1 1,4,7,10 ? *';
            }
            else{
                if(!String.IsBlank(SelectedRenewalFreqValue)&& !String.IsBlank(SelectedRenewalFreqDateOperator)){
                    Integer EOQMonth = GetEndOfQuarterMonth();//Getting quarter month
                    //Getting start of quarter
                    date endOfQuarter=Date.valueof(Date.today().year()+'-' + EOQMonth +'-' + Date.daysInMonth(Date.today().year(), EOQMonth) );
                    if(SelectedRenewalFreqDateOperator == Constants.PLUS){
                    if(endOfQuarter.adddays(integer.valueOf(SelectedRenewalFreqValue)) < date.today())
                    endOfQuarter = date.valueOf(endOfQuarter.addMonths(3));
                        QuarterDate = string.valueOf(endOfQuarter.adddays(integer.valueOf(SelectedRenewalFreqValue)).day());
                        Integer MonthNo = Integer.valueOf(endOfQuarter.adddays(integer.valueOf(SelectedRenewalFreqValue)).month()) - EOQMonth;
                        Integer TwelvethMonth = 12+MonthNo; 
                        if(TwelvethMonth >12)
                            TwelvethMonth = MonthNo;
                        String AllMonth = String.valueOf(3+MonthNo)+','+String.valueOf(6+MonthNo)+','+String.valueOf(9+MonthNo)+','+String.valueOf(TwelvethMonth);
                        sch = '0 0 '+ Schdtime+ ' ' + QuarterDate + ' '+ AllMonth + ' ? *';
                    }
                    else{
                    if(endOfQuarter.adddays(integer.valueOf('-'+SelectedRenewalFreqValue)) < date.today())
                    endOfQuarter = date.valueOf(endOfQuarter.addMonths(3));
                        Integer MonthNo = Integer.valueOf(endOfQuarter.adddays(integer.valueOf('-'+SelectedRenewalFreqValue)).month()) - EOQMonth;
                        Integer TwelvethMonth = 12+MonthNo; 
                        if(TwelvethMonth >12)
                            TwelvethMonth = MonthNo;
                        String AllMonth = String.valueOf(3+MonthNo)+','+String.valueOf(6+MonthNo)+','+String.valueOf(9+MonthNo)+','+String.valueOf(TwelvethMonth);
                        QuarterDate = string.valueOf(endOfQuarter.adddays(integer.valueOf('-'+SelectedRenewalFreqValue)).day());
                        sch = '0 0 '+ Schdtime+ ' ' + QuarterDate + ' '+ AllMonth + ' ? *';
                    }
                }
                else{
                    sch = '0 0 '+ Schdtime +' 30 6,9 ? *';
                    
                }
            }
        }

  • Schedule job
public string JobSchedular(){
string sch = GetCronStringForSchedule();
      string  jobID = system.schedule(BATCH_JOB_NAME, sch, batchjob);
return jobID;
}

Note: Constants is a separate class i have created to keep all my constants at one place and can be used in all classes.

VF page Code:

<apex:selectList label="Date Option" multiselect="false" size="1" id="RenewalFrequencyQuartely" value="{!SelectedRenewalFreqDatePeriod}"
                    rendered="{!IF(SelectedRenewalFrequency == 'Quarterly',true,false)}" disabled="{!IsDisabled}">
                    <apex:selectOptions value="{!FrequencyDatePeriod}"/>
                       <apex:actionSupport event="onchange"  action="{!RenewalFrequencyDatePeriodOnChange}" reRender="pbs10" status="theStatus"/>
                </apex:selectList>
                
                <apex:selectList label="Date Operator" multiselect="false" size="1" id="RenewalFrequencyDateOperator"  value="{!SelectedRenewalFreqDateOperator}"
                    rendered="{!IF(SelectedRenewalFrequency == 'Quarterly',true,false)}" disabled="{!IsDisabled}">
                    <apex:selectOptions value="{!DateOperator}"/>
                </apex:selectList>
                
                <apex:selectList label="Day Of Month" multiselect="false" size="1" id="RenewalFrequencyDayOfMonth"  value="{!SelectedRenewalFreqValue}"
                    rendered="{!IF(SelectedRenewalFrequency == 'Monthly',true,false)}" disabled="{!IsDisabled}">
                    <apex:selectOptions value="{!ListNoOfDayInMonth}"/>
                </apex:selectList>
                
                <apex:inputText label="No. of Days" value="{!SelectedRenewalFreqValue}" id="RenewalFreqMonthly" title="Date can be any value"
                    rendered="{!IF(SelectedRenewalFrequency == 'Quarterly',true,false)}" disabled="{!IsDisabled}"/>
                
                
                <apex:selectList label="Time" multiselect="false" size="1" id="RenewalTime" 
                    value="{!SelectedRenewalTime}" disabled="{!IsDisabled}">
                    <apex:selectOptions value="{!FrequencyTime}"/>
                </apex:selectList>

Hope this helps you. Happy Coding !!!